
Precision luthier tools. Made in Virginia, USA. Lifetime Warranty.


Share
Fretboard Radiusing Kit
Fretboard Radiusing Kit
Save Your Hands. Save Your Hours.
Radius a fretboard in minutes. Not an afternoon.
Hand-sanding a radius takes 45–60 minutes.
With this jig, you’ll be done in under 10 — perfectly consistent every time.
"The quickest, easiest, and most accurate way to radius a fingerboard" - Beau Hannam
Couldn't load pickup availability
Proudly designed and made by a small team of builders in Virginia, USA
Ships in 3-4 Business Days
Rout the radius. Sand it smooth. One kit, five radii.
The jig cuts the profile with a router in under ten minutes. The blocks finish it, a couple of minutes per grit. You get five matched pairs, so every radius you rout has a block sized to sand it.
What You Get
- 1 Fretboard Radius Jig body and router base with color-coded mounting holes
- 5 sets of 2 radius inserts, in the five radii you choose
- 5 radius sanding blocks, matched to those same five radii
- 4 M4 x 10mm mounting screws
Pick five radii once and both halves of the kit are built around them. No mismatched pairs, no working out which block goes with which insert.
Choosing Your Size
Jig Size sets the width of everything. Standard handles fretboards up to 3" wide and ships with 2.75" wide sanding blocks, which suits six-string guitars and most narrow-spec basses. Extended Range handles fretboards up to 5" wide and ships with 3.5" wide blocks, sized for 7 to 9 string guitars and 5 to 7 string basses.
Length sets how much board you cover per pass. All five blocks arrive in the length you select. 4" is for spot work. 8" and 10" are for general fretboard sanding, and the longer block levels faster because it bridges more of the board.
Router Compatibility
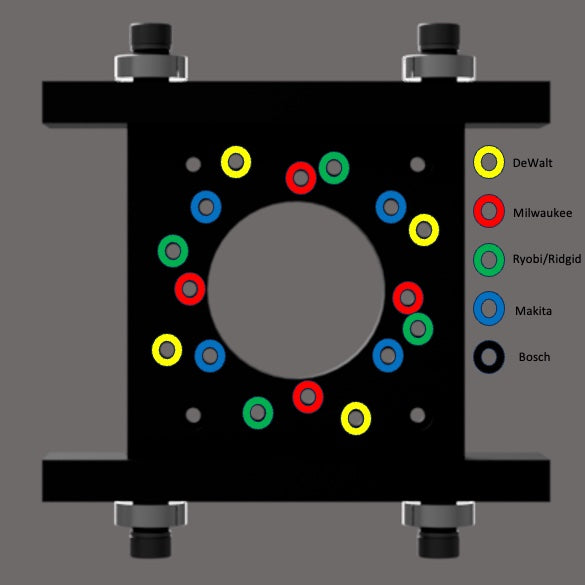
Color-coded mounting holes on the base plate match your router to the correct bolt pattern. Unscrew your existing subbase, drop in our base plate, done.
- DeWalt DWP611
- Milwaukee M18 Fuel
- Makita RT0701C
- Bosch PR20EVS
- Ryobi P601 One+ / Ridgid R2401
Router not listed? Email us with your model and we'll send a blank base plate you can drill for your router's bolt pattern. stringpluckery@gmail.com
Radius Options
7.25" to 30" imperial, plus 400mm and 430mm metric, and flat. Need something we don't list? Email us and we'll cut it at no extra charge.
Inserts swap in seconds, so moving between your five radii takes no setup. Additional radius inserts and sanding blocks are available individually if you add radii later.
The jig produces a continuous radius along the full length of the fretboard. It will not produce a compound radius.
Truss Rod Routing
The router base carries a threaded insert, so the same jig routs truss rod slots. Add a set of Truss Rod Inserts and the jig handles both jobs. We recommend the Amana 46202-K bit. A router extension adapter works if you need more reach, though cheap extensions introduce runout.
Sandpaper
2.75" blocks. Sized for 2.75" wide adhesive-backed sandpaper. 3M Stikit Gold rolls fit clean with no overhang.
3.5" blocks. 3.5" adhesive-backed paper isn't a standard size. Trim a 4" or 4-1/2" PSA roll down with a straightedge and utility knife, or cut standard sheets and attach with double-sided tape.
Material
Every part is 3D-printed in PLA. The reasoning is in Why We Use PLA. Covered by our lifetime warranty if any of it ever fails.
Specs
| Fretboard width | Standard up to 3" · Extended Range up to 5" |
| Sanding block width | 2.75" with Standard · 3.5" with Extended Range |
| Sanding block length | 4", 8", or 10" |
| Radius options | 7.25" to 30" imperial, 400mm and 430mm metric, flat, custom |
| Radii included | 5, each with 2 inserts and 1 matching block |
| Material | PLA |


Collapsible content
Key Features
- Interchangeable Radius: The jig comes with the option to select two radii (2 sets of two inserts)
- Variety of radius options: 7.25, 9.5, 10, 11, 12, 13, 14, 15, 16, 17, 18, 19, 20, 25, 26, 30
- Metric Radii Available: We also offer popular metric radii such as 400mm and 430mm
- Custom Radius Options Available: Contact us if you'd like a custom radius at no additional charge. Note: Any radius below 7.25" will likely not work with this design.
- Compatible with multiple routers: Color coded holes to easily identify the hole pattern for your router.
Compatible routers:
M18 Fuel
Ryobi P601 One+
Dewalt DWP611
Bosch PR20EVS
Makita RT0701C
Ridgid R2401 - Designed for a continuous radius: will not work for a compound radius
- Standard Jig Design: will work with fretboards up to 3" wide
- Extended Range Jig Design: will work with fretboards up to 5″ wide
- Material: PLA
Inside the package:
- Fretboard Radius Router Jig body
- Router base
- Your chosen radius inserts.
- 4 M4 x 10mm long screw to mount the router to the base
Truss Rod Routing
The router base includes a threaded insert for attaching our Truss Rod Inserts directly to the center. Precise, stable truss rod routing from the same jig.
Recommended bit: Amana 46202-K. If you need more reach, use a high-quality router extension adapter. Cheap extensions introduce runout and kill your accuracy.
How to Use
We recommend a long straight bit with a 3/8″ cutting diameter such as the Whiteside 1023.
1. Setting the Height:
Choose the thickness of your preferred board material (MDF, plywood, or hardwood) such that, when placed on your working surface, there’s a 1.5-inch height from the top of the surface to the top of the fretboard.
Importance of 1.5-inch Height: The radius inserts are designed to compensate for the distance from where the router base contacts the radius insert to the top of the fretboard. This height ensures an accurate radius replication. If the setup has a height less than 1.5 inches, there’s a risk that the resulting radius on the fretboard may be rounder than intended.
2. Board Preparation:
Cut the chosen board material to a width of 4.5 inches (6.5" for extended range version). Ensure the edges are straight and the board is free from defects.
Securing the Materials:
3. Use double-sided tape to affix the board to your workbench securely.
4. Positioning the Fretboard:
Center the fretboard onto the affixed board, ensuring even spacing on all sides. Once positioned correctly, use double-sided tape to secure the fretboard in place.
Note: Carefully inspect the fretboard to verify there are no raised sections or uneven areas that might interfere with the routing process.
5. Attaching the Jig:
Attach the jig to the router base using the provided screws, ensuring a firm and secure fit.
6. Installing Radius Inserts:
Slide the desired radius inserts into the slot located in the jig’s body. Once properly positioned, tighten the set screws to secure the inserts in place.
7. Placing the Jig Body:
Position the Fretboard Radius Router Jig body onto the setup constructed in steps 1-4.
8. Positioning the Router:
Place the router base onto the jig body, ensuring it aligns correctly and sits stably. Make sure all four bearings on the router base are making contact with the radius insert for accurate routing.
9. Centering the Router:
Align the router using the center lines provided on both the router base and the radius insert.
10. Adjusting the Router Bit:
Carefully lower the router bit until it barely touches the fretboard. We advise against using a spiral bit for this process. Opt for a straight bit for the best results.
11. Starting the Routing Process:
Slide the jig in a manner that the router bit is clear of any wood. With the bit in a clear position, safely turn the router on, readying it for the routing process.
12. Routing the Fretboard:
Begin routing the fretboard. Ensure the router base bearings maintain contact with the radius insert at all times. Move with the grain of the wood. After completing each pass, slide the router base laterally to start a new path, ensuring full coverage of the fretboard surface.
FAQ
Which five radii should I choose?
This kit ships with five sets of inserts and five sanding blocks, so you are choosing five radii. Here is how the common ones map to real instruments. 9.5" and 12" will cover most builds. The others are there for when you need them.
- 7.25" Vintage Fender. Pre-1983 Strat and Tele, and vintage P and J Bass. The fussiest to set up, since notes will choke on bends unless the action stays a little higher.
- 9.5" The modern Fender standard on both guitar and bass. If you only ever used one radius, this is it.
- 10" PRS and some Music Man.
- 12" Gibson. Les Paul and SG, and most modern four and five string basses.
- 14" Modern Fender Ultra and Charvel.
- 16" The shred end. Ibanez, Jackson, Schecter, and modern five and six string bass.
- 20" Very flat. Extended range guitar and flat modern bass.
A spread of 7.25", 9.5", 12", 16" and 20" covers vintage through modern through shred on both instruments without leaving a gap. If you know you will never do a vintage build, swap the 7.25" for a 10" and you get tighter coverage in the middle where most builds sit.
Metric 400mm and 430mm are also stocked, and we cut custom radii at no extra charge. Tell us the number.
Can this jig cut a compound radius?
No. It produces a single continuous radius along the full length of the board. Plenty of modern necks are compound, 10" to 16" being the common one, so it is worth being clear that this jig will not do that.
Will it handle a five string bass neck?
Depends on the jig size you pick. Standard handles fretboards up to 3" wide, which covers every guitar and every four string bass. A five string can run past 3" at the heel, and that needs the Extended Range version. Note also that this kit ships with 2.75" wide sanding blocks, which are right for guitar but narrow on a wide bass board. We make 3.5" blocks separately.
Previously all I had were sanding blocks with the neck radius shape, but no jig or other means to shape the fingerboard before that. Sanding down to the desired radius is both absurdly dusty and ridiculously time consuming. So, with my Makita trim router in one hand, and this fretboard radiusing kit, I'm now able to shape a fingerboard in minutes. With the kit, my control and accuracy are both excellent. Attaching the router was straightforward. The interchangeable radius shapes are a smart feature, incredibly easy to swap out. And an obvious bonus is that with the flat insert, I now have a quality jig for truss rod channels! My own jig for that is nowhere near this sturdy. This kit is wonderful and worth the price for sure! The very minor thing I'd ask for is a centerline mark/groove on the front and back of the sled to visually line things up, "just to be sure."
Accuracy and quality are valuable to a luthier. String Pluckery delivers on both. I highly recommend the fretboard radius jig and sanding blocks.
Great product! Makes life easier and well built!
Excellent product. Saves me hours of sanding and radius come out perfect.