Precision luthier tools. Made in Virginia, USA. Lifetime Warranty.


Fretboard Radius Jig
Fretboard Radius Jig
Save Your Hands. Save Your Hours.
Not the 45 to 60 it takes by hand.
Perfectly consistent. Every build. Every time.
"The quickest, easiest, and most accurate way to radius a fingerboard."
Couldn't load pickup availability
Built for 6 compact routers. No adapters. No modifications.
Color-coded mounting holes on the base plate match your router to the correct bolt pattern. Unscrew your existing subbase, drop in our base plate, done. Setup takes minutes.
Router Compatibility
DeWalt DWP611
Milwaukee M18 Fuel
Makita RT0701C
Bosch PR20EVS
Ryobi P601 One+ / Ridgid R2401
Router not listed? Email us at stringpluckery@gmail.com with your model. We'll send a blank base plate you can drill for your router's bolt pattern.
Radius Options
16 radii. 7.25" to 30". Metric 400mm and 430mm. Custom radius at no extra charge.
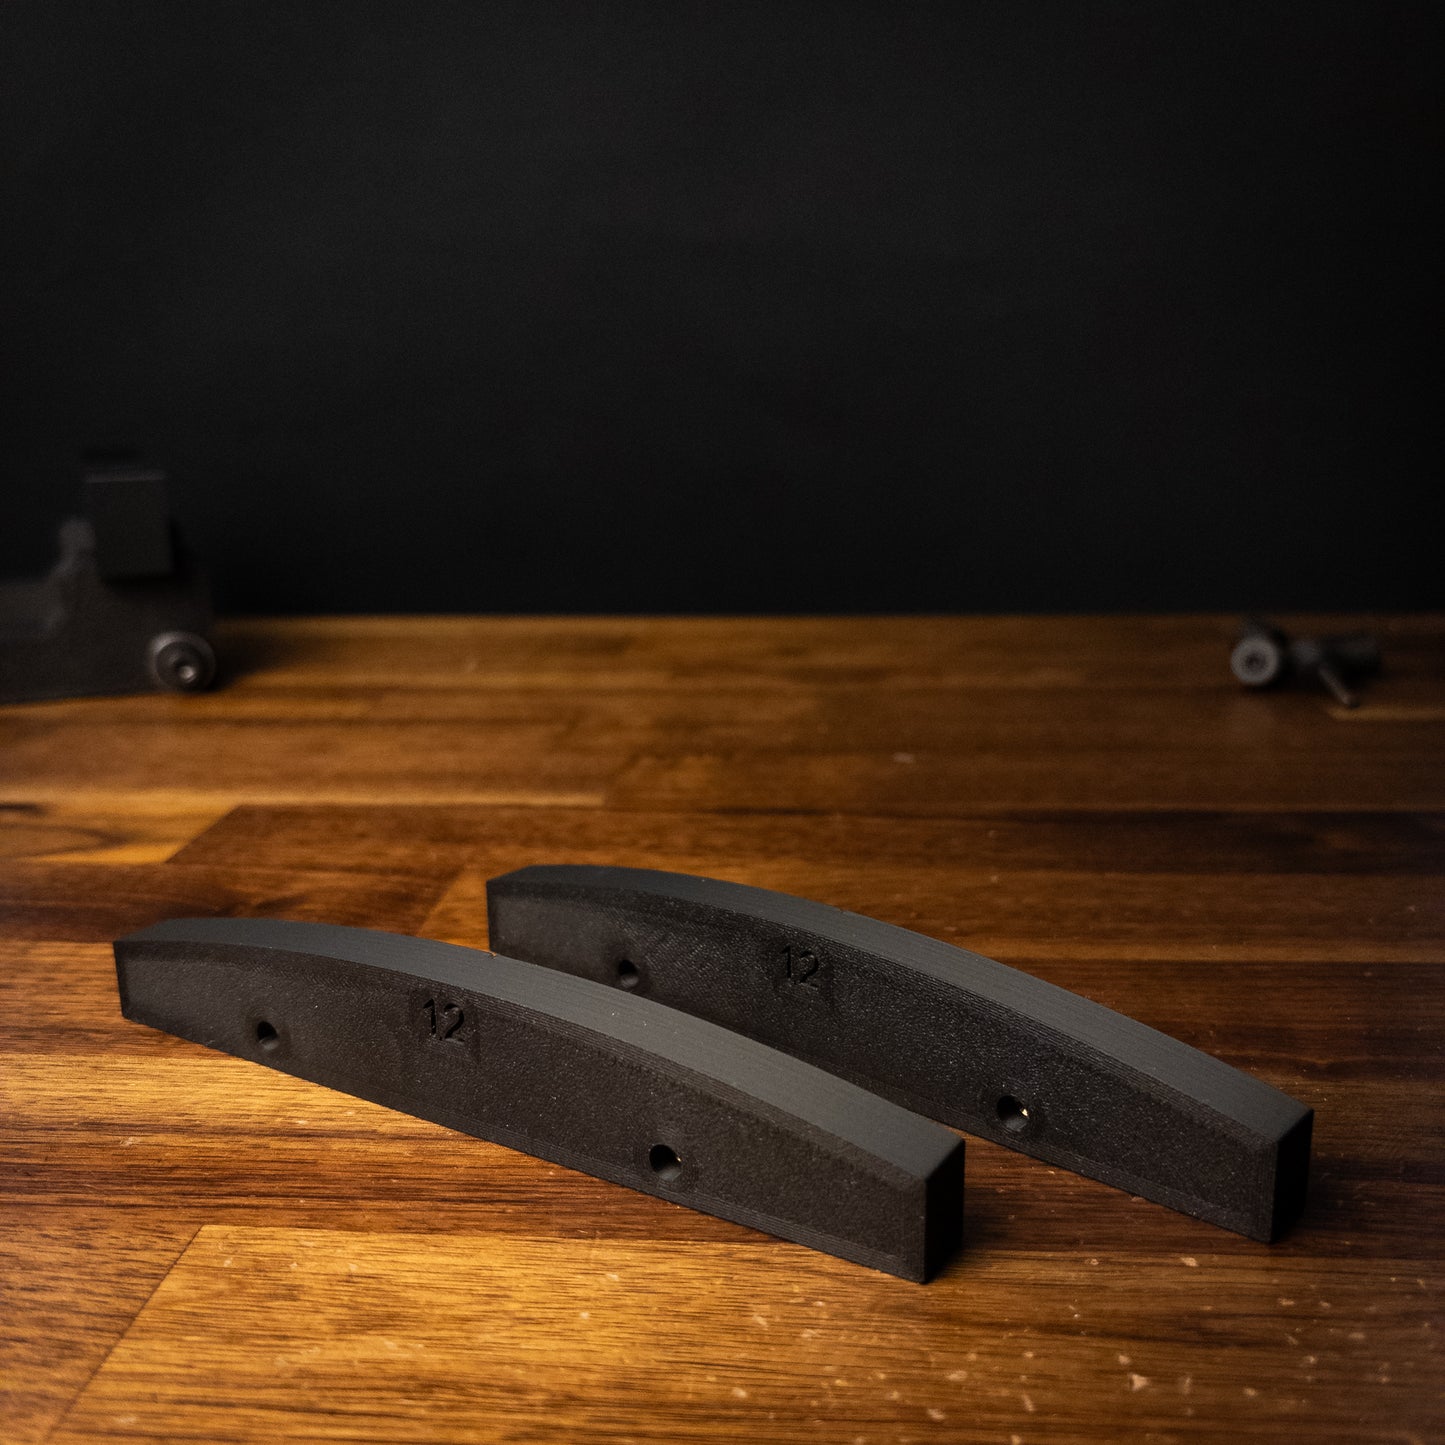
Each jig ships with your choice of 2 radius inserts. Swap between them in seconds. Additional radii are available individually.
The router base also includes a threaded insert so the same jig can rout truss rod slots. Add a set of Truss Rod Inserts and you're set.
This jig produces a continuous radius along the full length of the fretboard. It will not produce a compound radius.
What's in the Box
- 1 Fretboard Radius Router Jig body
- 1 Router base with color-coded mounting holes
- 2 radius inserts (your chosen radii)
- 4 M4 x 10mm mounting screws
Specs
| Radius options | 16 imperial (7.25" to 30") + 2 metric (400mm · 430mm) |
| Fretboard width | Standard: up to 3" · Extended Range: up to 5" |
| Truss rod routing | Supported with optional Truss Rod Inserts |
| Material | PLA |


Collapsible content
How to Use
At a glance:
- Build a stack that places the top of your fretboard 1.5" above your bench.
- Seat the jig, install your radius inserts, mount the router.
- Route the fretboard in passes with the grain.
Step-by-step:
1. Set the height.
The top of your fretboard needs to sit 1.5" above your bench surface. A 3/4" MDF base with 1/2" MDF on top and a 1/4" fretboard lands you right at 1.5". Anything shorter and your routed radius will come out tighter than the insert specifies.
2. Prepare the board.
Cut your base board material to 4.5" wide (6.5" for the Extended Range version). Straight edges, no defects.
3. Secure the board to your bench.
Use whatever method works for your setup. Double-sided tape, clamps, glue, screws, or nails all get the job done. The board needs to stay dead still for the entire routing process.
4. Secure the fretboard to the board.
Center it with even spacing on all sides. Double-sided tape is ideal here. It holds tight and peels clean without damaging the fretboard. Check for any raised sections or high spots that could interfere with routing.
5. Attach the router to the router base using the four provided M4 x 10mm screws.
6. Install the radius inserts.
Slide your chosen inserts into the slots on the jig body. Tighten the set screws to lock them.
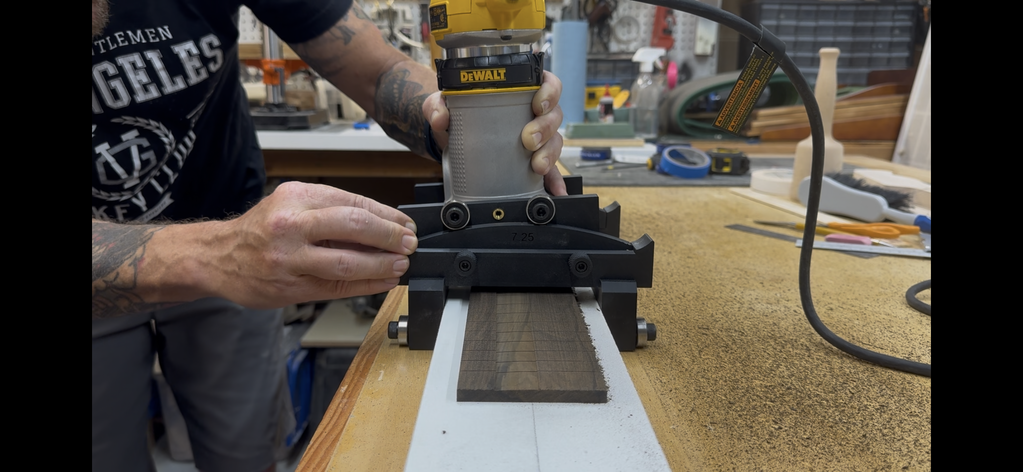
7. Place the jig body over the fretboard.
The jig body is the gantry that spans the fretboard. The radius inserts on either side are what the router base bearings ride on, and together they define the arc the bit will cut. Set the jig body down over the stack you built in steps 1-4.
8. Seat the router on the jig.
Set the router (now mounted to its base) onto the jig body. Confirm all four bearings on the router base are making clean contact with the radius inserts. Any bearing that isn't riding the insert means the radius won't be true.
9. Center the router using the centerlines marked on the router base and the radius insert.
10. Lower the bit until it just kisses the top of the fretboard.
11. Start the router.
Slide the jig so the bit is clear of the wood, then turn the router on.
12. Route the fretboard.
Move with the grain. Keep all four bearings in contact with the inserts the entire pass. Shift laterally between passes for full coverage of the fretboard width.
Bit selection.
A long straight bit with a 3/8" cutting diameter works best for fretboard radiusing. The Whiteside 1023 is a solid, widely available option. A bottom-cleaning or bowl bit also works and tends to leave a smoother finish between passes. PreciseBits makes bits specifically for fretboard work at 0.125" diameter. They'll do the job but require more passes due to the smaller cutting width. Whatever bit you choose, make sure it has enough reach to maintain the 1.5" setup height from step 1.
Truss Rod Routing
The router base includes a threaded insert for attaching our Truss Rod Inserts directly to the center. Precise, stable truss rod routing from the same jig.
Recommended bit: Amana 46202-K. If you need more reach, use a high-quality router extension adapter. Cheap extensions introduce runout and kill your accuracy.
FAQ
My routed radius came out rounder than the insert I used. What happened?
The crest of the fretboard radius needs to sit exactly 1.5" above your bench surface. If the stack is shorter, the router base contacts the inserts at a different point along the arc and gives you a tighter radius than the insert is marked for. A 3/4" MDF base with 1/2" MDF on top and a 1/4" fretboard puts you right at 1.5".
Climb cut or conventional cut with this jig?
This is still a router cutting wood, so the same rules apply. Conventional cutting (feeding against the bit's rotation) gives you better control and cleaner cuts on a hand-guided jig. Climb cutting (feeding with the rotation) can leave a smoother surface on figured or curly woods but pulls the router aggressively, which is risky on a freehand slide. Start with conventional passes. If you want to finish with a light climb pass on figured stock, keep it shallow and controlled.
Can I use this jig for inlay work?
Yes. For inlay routing (cavities for shell, abalone, or mother-of-pearl) use PreciseBits carbide bits at 0.125" cutting diameter. They're built for fine detail and leave clean edges. More passes required due to the smaller cutting width, but the precision is worth it.
Do I need to do multiple depth passes?
Depends on the wood. Softer tonewoods like rosewood or standard maple can usually take one or two passes without issue. Dense hardwoods (ebony, wenge, purpleheart) or anything with figured grain (curly maple, birdseye, flame) should be done in multiple shallow passes. It's still a router cutting wood. Taking too much material in one pass bogs the bit down, builds heat, risks tearout on brittle or figured stock, and puts unnecessary stress on the jig. A reasonable baseline: 1/16" per pass on anything dense or figured, a bit deeper on softer woods if the cut stays clean. If the router starts dragging or you smell burning, back off the depth.
Can I radius the fretboard with it already attached to the neck?
Yes. Flat, Fender-style headstocks are ideal. Clamp or tape the neck down with the fretboard flat and level, and you're set. Angled headstocks take more work. You'll need to get creative with workholding to shim or support the neck so the fretboard surface is parallel to your routing plane. Whichever setup you use, the top of the fretboard still needs to sit at 1.5" above your bench surface. Adjust the stack height underneath accordingly.
Worth every penny and more. If you're building more than 1 guitar, this tool is punching well above its weight and you need this in your shop!
I have not used the product as of yet. So
I can not review how well it works at this point. It appears to be well built. I received it later than expected. But the owner emailed me and stated that they were in the process of moving the shop and would ship it in a couple days. The only issue I have with the whole transaction is the fact that the package did not come with a packing slip or any type of instructions. No written correspondance at all. Only the product itself was in the package.
Works great!
Fantastic quality product.
I love the Radius Jig and the Truss Rod attachment. I wish I had gotten the larger version of the Jig, because I also used the Truss Rod attachment to route channels for carbon fiber rods in the neck, but the narrower Radius Jig gets stopped by the headstock. For radiusing the fretboard, it was awesome and fast!